Agricultural Literacy Curriculum Matrix
Lesson Plan
Properties of Soils (Grades 3-5)
Grade Level
Purpose
Students discover that different soils have different characteristics, examine different types of soil, investigate soil components, and observe how air space allows soils to hold and transmit water. Grades 3-5
Estimated Time
Materials Needed
Activity 1: Properties of Soil
- 3 clear, 12 oz (29.5 mL) plastic bottles
- Potting soil, 10 oz (283 g) (see Preparation Instructions)
- Local soil, 10 oz (283 g) (see Preparation Instructions)
- Sand, 10 oz (283 g) (see Preparation Instructions)
- Water
- Funnel (optional)
Investigation 1: Looking at Soil Samples
- Master 2.1, 1 copy per group
- Master 2.2, 1 copy per student
- Hand lenses, 2 per group
- Potting soil (labeled "Soil A"), 1 teaspoon (5 g) per group
- Local soil (labeled "Soil B"), 1 teaspoon (5 g) per group
- Plastic spoons
Investigation 2: Soil and Air Space
- Master 2.3, 1 copy per student
- Clear 9 ounce (29 mL) plastic cups (approximately 3" (7.62 cm) tall and 3.75" (9.52 cm) across the top), 3 per group
- Permanent marker, 1 per group
- Potting soil, 1/2 cup (170 g) per group
- Local soil, 1/2 cup (170 g) per group
- Sand, 1/2 cup (170 g) per group
- Small paper cups containing 1/2 cup (120 mL) of water, 3 per group
- Ruler, 1 per group
Elaborate
Vocabulary
inorganic: composed of material from nonliving sources; rocks, sand, and minerals are examples of inorganic materials
organic: living or once-living organisms; derived from living organisms
percolation: the movement of water within and through the soil
porosity: the percentage of soil volume that is not occupied by solids
Background Agricultural Connections
After completing this lesson, students will be able to:
- list aspects of soil composition;
- recognize that soils vary in composition; and
- provide examples of ways that soils differ in their ability to absorb water.
View the Properties of Soils Lesson Video to obtain background information for the lesson.
This lesson is one of a five part series. See the following titles for related lessons:
- Plants Around You: Students learn about the functions of plant parts and the environment plants need to grow.
- Properties of Soils: Students learn about the characteristics and components of soil.
- Plant-Soil Interactions Students learn about the function of roots and how water and nutrients move through a plant.
- Plant Growth Affects the Soil: Students learn about how plant growth takes nutrients from soil and how nutrients can be replaced.
- How Does Your Garden Grow?: Students make a plan for a garden.
Engage
- Ask the students the following introductory questions:
- Do soils vary in their compositions?
- Do soils contain materials from both nonliving and living sources?
- Does soil contain air?
- Do soils differ in their abilities to hold and transmit water?
Explore and Explain
Activity 1: Properties of Soils
- Review with students that plants need nutrients in soil to grow. Ask students, “What is soil?” and “What is found in soils?” Write students’ responses on the board or chart paper.
- Continue the discussion by asking students, “Can you group the items from the chart into different categories?” Ask students what they would put in the different categories. Record their responses on the board or chart paper. Guide the discussion to bring out the fact that soil consists of nonliving material, such as sand, silt, and clay, as well as living material, such as bacteria, insects, worms, and the remnants of previously living organisms (e.g., dead plant material or even the bodies of decomposed dead animals such as insects). Materials from living or once living organisms can be called organic, and nonliving materials such as clay, rocks, or sand are inorganic materials.
- Inform the students that they will be observing different kinds of soil to learn more about what is in them. Show the class the bottles of potting soil, local soil, and sand that were previously mixed with water and allowed to settle. Explain how they were prepared. Ask the students to gather around the bottles and record their observations about the different soils. Caution students not to pick up or move the bottles.
- The potting soil will show a thick layer of dark material on the bottom, a thick layer of cloudy water, and a thinner layer of material on the top.
- Local soils may differ, but a typical soil will show layering similar to potting soil, though there may be less material floating on the surface.
- Most of the sand will form a very thick layer on the bottom of the container. There will be a thick layer of clear water and a very thin layer of material on the surface.
- Remind the students of the categories that they created earlier (Procedure 2). Ask the students if they can tell which categories match up with the different layers in the bottles.
- Point out the thin layer that floats on the surface. Inform students that this material is mostly made up of the materials in soil that came from organisms that were once alive but are dead now and have been decomposed by other organisms in the soil.
- If students are not sure how a once living organism would now be in the soil, ask if they have ever seen a tree that has fallen and has started to rot and break down. They may also have seen insects that have died and are in early stages of decomposition.
- If students have learned about density, reinforce their understanding of that concept by explaining that some materials in the soil are more dense (e.g., sand and rock) while other materials are less dense (e.g., clay, the organic material floating on top).
- Explain to the students that the cloudiness in the water comes from small particles called clay. Clay particles are like rock or sand in that they are nonliving. They are very small—so small that they can remain suspended in the water.
- Ask the students, “How do soils help plants grow?” Write student responses on the board. Some of the ideas students may suggest include:
- Soils provide support for plants’ root systems.
- Soils provide nutrients that plants need to grow.
- Soils hold water and make it accessible to plants.
- Ask the students, “Do plants grow well in any kind of soil?” (no)
- Inform students they are now going to perform two investigations to observe other properties of soils that affect plant growth. For Investigation 1: Looking at Soil Samples, divide the class into groups of four students and provide each group with 1 copy of Master 2.1, 4 copies of Master 2.2, 2 hand lenses, 1 teaspoon of soil A, 1 teaspoon of soil B, and a plastic spoon.
- Instruct the students to follow the directions on their handouts, record their observations, and answer the questions on the handouts. Give students approximately 15 minutes to complete their investigation.
- After the groups complete their investigation, reconvene the class and ask each group to take turns describing their investigation and reporting their results. As necessary, ask guided questions to bring out the following:
- Soils differ in their composition.
- Soils contain nonliving and living (or once-living) things.
- Visual inspection cannot fully evaluate everything about soils.
- For Investigation 2: Soil and Air Space, have the students work in their same groups and provide each group with 1 copy of Master 2.3, a cup of potting soil, a cup of local soil, a cup of sand, 3 cups of water, a ruler, and a permanent marker.
- Instruct the students to follow the directions on their handouts, record their observations, and answer the questions on their handouts. Give students approximately 15 minutes to complete their investigation.
- After the groups complete their investigation, have the students summarize what they have learned about soils by creating a list. Write the list on the board or on chart paper. Students should mention the following:
- Soils contain different kinds of materials.
- Different soils contain different amounts of air spaces between the particles.
- Different types of soil allow water to pass at different rates.
- Explain to the students that farmers and gardeners sometimes dig up or till the soil in the spring to loosen it up (make it less compacted) and they may even add decomposed plant and animal materials to the soil. Ask, "Why do you think they go through these steps to prepare the soil? Can you think of any reason these steps may not be good for the soil?" (Breaking up or loosening the soil allows air to get into the soil for better root growth, and it may help water penetrate the soil. Adding organic matter to the soil provides plants with the nutrients they need. Digging up soil is not always good for plant growth because the soil can wash or blow away more easily, and plants need soil. Many farmers have learned how to grow healthy crops without tilling the soil.)
Elaborate
-
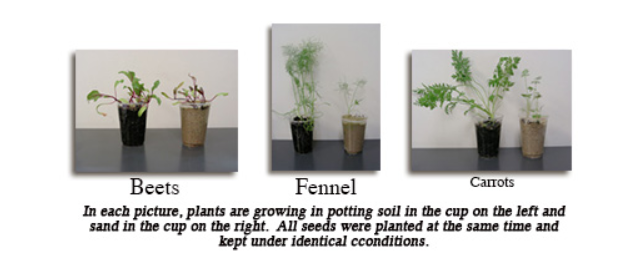
Investigate the importance of the type of soil for plant growth by planting seeds in potting soil, local soil, and sand. Water the seeds frequently, and use Master 2.4 to record observations over a 2-3 week period.
-
Play the My American Farm interactive game Thrive.
Evaluate
After conducting these activities, review and summarize the following key concepts:
- There are many different types of soil. Soil can contain different mixtures of particles such as sand, silt, or clay.
- The composition of soil affects its ability to hold water and nutrients.
- Different plants prefer different soil types. Farmers manage their soil to meet the needs of the plants they are growing.
Acknowledgements
- BSCS-Biological Science Curriculum Study
- Reviewed by Smithsonian Institution
Recommended Companion Resources
- 4R Reader
- AgBadging Field Guide
- Is There Ever Too Much of a Good Thing?
- My American Farm
- Nutrients for Life eLessons
- SOIL Reader
- Soil Health Education Resources
- Soil Life
- Soil Painting
- Soil Science Society of America
- Soil Science Videos
- Soil! Get the Inside Scoop
- The Dirt Book: Poems About Animals That Live Beneath Our Feet
- Under Your Feet: Soil, Sand and Everything Underground
Author
Organization
 |
We welcome your feedback! If you have a question about this lesson or would like to report a broken link, please send us an email. If you have used this lesson and are willing to share your experience, we will provide you with a coupon code for 10% off your next purchase at AgClassroomStore. |