Agricultural Literacy Curriculum Matrix
Lesson Plan
Farming in a Glove (Grades K-2)
Grade Level
Purpose
Students observe how a seed sprouts and investigate the conditions necessary for germination to occur. Grades K-2
Estimated Time
Materials Needed
Engage:
- Food, Plant, and Seed Cards, 1 set per group
Activity 1: Seed Properties
- Soybean, corn, oat, wheat, and alfalfa seeds, 2 of each seed per student*
- Seed Cards, 1 set per group
- Hand lenses, minimum of 1 per group
- Seed Properties Chart, 1 per student
- Physical Properties Anchor Chart
- Soybean Dissection Image
- Corn Dissection Image
Activity 2: Seed Germination
- Food, Plant, and Seed Cards, 1 set per group
- Permanent markers, minimum of 1 per group
- Food handler's gloves, 1 per student*
- Soybean, corn, oat, wheat, and alfalfa seeds, 2 of each seed per student*
- Cotton balls, 5 per student*
- Bowls of water, 1 per group
- Rolls of tape, 1 per group
- Science journal
Activity 3: Changing Variables
- Food handler's glove, 1 per group*
- Permanent marker, 1 per group
- Cotton balls, 5 per group*
- Bowls of water, 1 per group
- Soybean, corn, oat, wheat, and alfalfa seeds, 2 of each seed per group*
- Rubber bands, 1 per group
- Bowls of ice or ice-cold water, 1 per group
- Plastic wrap
*These items are included in the Farming in a Glove Kit, which is available for purchase from agclassroomstore.com.
Vocabulary
cotyledon: an embryonic leaf in seed-bearing plants, one or more of which are the first leaves to appear from a germinating seed
dormant: not active but able to become active
embryo: a human, animal, or plant in the early stages of development before it is born, hatched, sprouted, etc.
endosperm: tissue formed within a seed that contains energy (starch) and protein for the germinating seed
germinate: to begin to grow; sprout
seed coat: the protective outer covering of a seed
Did You Know?
- Most seeds germinate best under dark conditions, but some seeds, like dill, lettuce, and peppers, need light to germinate.1
- The oldest seeds to germinate and grow into a plant were 32,000 years old. The seeds of the Silene stenophylla plant were found by a team of Russian scientists who germinated the seeds. The seeds grew into a plant that flowered and produced new seeds.2
- Some plants, like ferns, do not produce seeds. Ferns are nonflowering plants that develop spores in cases on the undersides of their leaves. When the cases dry out, the spores are released into the air. If suitable conditions exist, the spores are fertilized and transformed into a new plant.3
Background Agricultural Connections
Seeds are vital to our survival. Without seeds, the plants that provide our food, fuel, fiber, oxygen, and many other essential products would not exist. Seeds are the method by which some plants reproduce. Each seed has a seed coat, an embryo, or baby plant, and a food source in the form of either an endosperm or cotyledons.
In order for a seed to germinate, or sprout, it needs warmth, moisture, and air. Seeds remain dormant and will not germinate until the proper conditions are present. For example, in some climates the winter soil temperature may dip to below 32°F. Seeds will not sprout in these conditions. Once the ground thaws in the spring and the temperature rises to approximately 65°F, most seeds will sprout if moisture and air are also available. Most seeds germinate when the temperature is between 65-85°F.
In the germination process, moisture softens the seed's outer protective covering, called the seed coat. The embryo pushes through the softened seed coat and the new plant begins to grow. The roots push further down into the soil and a shoot, which contains the new plant's stems and leaves, pushes up towards the surface.
The germination process can be somewhat mysterious because it typically occurs underground where it cannot be observed. The clear plastic glove and cotton balls used in this activity provide an opportunity to view the germination process and the plant's beginning growth and root system.
Learning about seeds and the germination process offers a wide variety of opportunities for scientific investigations and experiments. Working with moisture, light, air, and temperature as variables, students can design experiments to discover optimal conditions for germination.
Engage
- Organize the students into five groups. They will remain in these groups for the entire lesson. Give each group a set of Food Cards. Ask the students to identify each item on the cards. Explain that all of these items are food for humans or animals.
- Tell the students that all of these foods come from plants that are grown on farms. Give each group a set of Plant Cards. Ask the groups to try to match the food pictures with the plants they come from. Review the correct matches.
- Explain to the students that every plant begins as a seed. Give each group a set of Seed Cards. Ask the students to try to match the seed, plant, and food pictures together. Review the correct matches.
- Tell the students they are going to learn more about these seeds and how they grow into plants.
Explore and Explain
Activity 1: Seed Properties
- Provide each group with soybean, corn, oat, wheat, and alfalfa seeds and hand lenses.
- Instruct the students to match the seeds with the Seed Cards. Review the correct matches.
- Allow time for the students to observe the seeds with the hand lenses. Discuss their observations.
- Pass out the Seed Properties Chart to each student. Explain to the students that a property describes how an object looks, feels, or acts. By describing the size, shape, color, texture, and mass of each seed, they will be describing the properties of the seeds.
- Project the Physical Properties Anchor Chart on a large screen. Discuss the adjectives on the chart that could be used to describe the properties of the seeds. Have the students work together as a group to complete their Seed Properties Charts.
- Discuss the properties of the seeds the students listed on their charts. Ask the students, "How are these seeds alike and different?"
- Ask the students what they think the seeds look like inside. Project the Soybean and Corn Dissection Images onto a large screen. Point to the embryo inside each seed. Explain that inside every seed is an embryo, a baby plant. The embryo has the potential to grow into a new plant.
- Point to the cotyledons inside the soybean seed and the endosperm inside the corn seed. Explain that seeds also contain food that the embryo uses for energy as it sprouts. Depending on the type of seed, the nutrients are absorbed or stored in either the cotyledon or endosperm of the seed.
Activity 2: Seed Germination
- Have the students look at their group's matched Food, Plant, and Seed Cards. Ask the students to imagine that they are farmers that want to grow one of these crops. Ask, "How would you begin the growing process?" (plant the seeds)
- Ask the students, "What do farmers need to provide in order to help the seeds grow into the plants that provide humans and animals with food?" (water, air, and warmth; Once the germinating seed sprouts, the new plant will also need nutrients and light.)
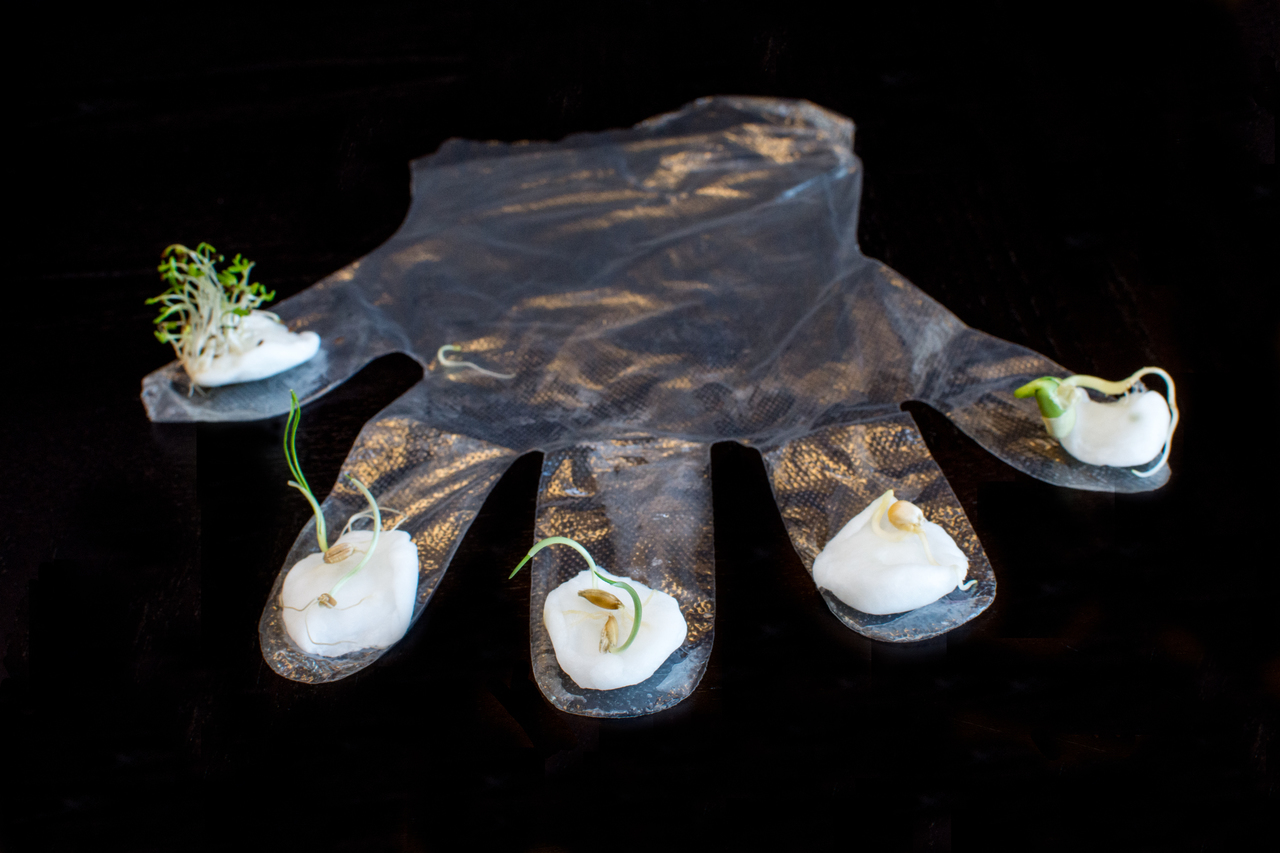
- Tell the students that they are going to provide their seeds with everything they need to germinate. Germinate is a scientific word for sprout. Explain that they will be germinating seeds in a very small farm—a farm in a glove.
- Demonstrate the process of making a farm in a glove:
- Use a permanent marker to write the name of a different seed—soybean, corn, oats, wheat, and alfalfa—on each finger and thumb of the glove. Write your name in the center of the glove.
- Dip five cotton balls into the water. Squeeze any excess water out of the cotton balls so that they are saturated but not dripping. (Note: If you are sprouting large seeds like corn, squash, peas, or beans, use two moistened cotton balls).
- On each cotton ball, place one or two of the same variety of seeds until you have five cotton balls, each with a different type of seed on it.
- Place the "seeded" cotton balls into the correctly labeled fingers of the glove.
- Fold down the opening of the glove and secure it with tape.
- Distribute the gloves, permanent markers, cotton balls, water bowls, seeds, and tape to each group. Assist students in creating their farm in a glove.
- Display the gloves by hanging them (fingers facing downward) on a classroom bulletin board. Because the cotton balls contain enough water to germinate the seeds, there is no need to water. Most seeds will sprout within a week. (Note: Some seeds, such as lettuce, cabbage, and peppers, can take up to two weeks to germinate.)
- Have the students record daily observations of their germinating seeds. Instruct them to trace their hand on a page of their science journal for each day of observation. They can draw a picture of each seed or seedling on the appropriate finger of their tracing and note measurements and changes in the margins of the page.
- Some sprouts can be transplanted in 1-2 weeks. Cut the bottom off of each finger of the glove and remove the cotton balls with the sprouts. The entire cotton ball should be transplanted along with the seedling into the soil.
Activity 3: Changing Variables
- Ask the students what a seed needs in order to germinate. (water, air, and warmth)
- Ask the students what they think might happen if one of these needs were missing. Do they think the seeds would germinate? Explain to the class that they are going to investigate what happens when you try to germinate a seed without either water, air, or warmth being present.
- Assign each group one of the five seeds to test—soybeans, corn, oats, wheat, or alfalfa.
- Demonstrate how to set up the investigation:
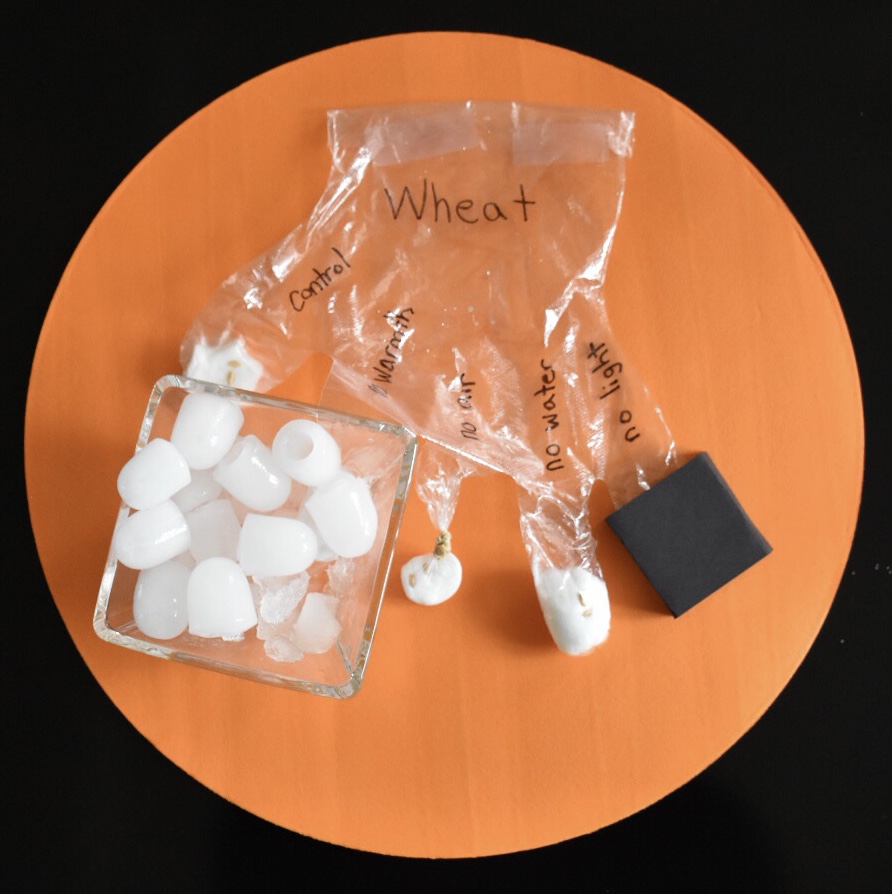
- Use a permanent marker to write the type of seed the group was assigned in the center of the glove.
- The thumb of the glove will hold the control seed. This seed will receive water, air, and warmth. Write "control" on the thumb.
- Write one of the following on each of the next three fingers—no water, no air, no warmth.
- Groups will design an investigation of their choice for the last finger. Groups may choose to investigate whether or not the seed will germinate in the dark or when using a liquid other than water. Instruct the groups to label the last finger with the changed variable of their choosing.
- Dip three of the cotton balls into water. Squeeze any excess water out of the cotton balls so that they are saturated but not dripping. Add the seeds onto each cotton ball and place two of the "seeded" cotton balls into the "Control" thumb and the finger labeled "no warmth."
- Wrap the third "seeded" cotton ball in plastic wrap and place it into the finger labeled "no air." Remove as much air as possible from the finger and tightly wrap a rubber band just above the cotton ball.
- Place the finger labeled "no warmth" into the bowl of ice or remove the finger, secure the open end with tape, and place in the refrigerator.
- Place a dry cotton ball and seeds into the finger labeled "no water."
- Prepare the last finger according to the changed variable choice.
- Fold down the opening of the glove and secure it with tape.
- Provide each group with a glove, permanent marker, five cotton balls, a water bowl, ten of the assigned seeds, a rubber band, and a bowl of ice or ice-cold water. Assist students in creating their farm in a glove.
- Have the students record daily observations of their germinating seeds like they did in Activity 2.
- After observing the seeds for two weeks, have each group share their observations and conclusions with the class.
Elaborate
-
Have students discuss and draw the life cycles of plants that provide us with food.
-
Prepare a nutritious snack using products from the plants that were germinated (soybean, corn, oat, or wheat) to show what kind of food the plants produce once they grow to maturity.
-
Create a "Salad Garden in a Glove" by germinating five different vegetable seeds in a glove.
-
View a time-lapse video of a germinating mung bean.
Evaluate
After conducting these activities, review and summarize the following key concepts:
- Most plants begin their life as a seed.
- Seeds have seed coats, an embryo, and a food source in the form of either an endosperm or cotyledons.
- In order to germinate, a seed needs moisture, air, and warmth.
Sources
Recommended Companion Resources
- A Seed in Need: A First Look at the Plant Cycle
- A Seed is Sleepy
- Farming in a Glove
- Growing Letters!
- Growing Microgreens
- How to Use a Ragdoll Test to Estimate Field Germination
- Living Necklace Kits
- My School Yard Garden
- Oh Say Can You Seed?
- Sadie's Seed Adventures: Learning About Seeds
- Seed, Soil, Sun: Earth's Recipe for Food
- Sprouting Success
- The Curious Garden
Author
Organization
 |
We welcome your feedback! If you have a question about this lesson or would like to report a broken link, please send us an email. If you have used this lesson and are willing to share your experience, we will provide you with a coupon code for 10% off your next purchase at AgClassroomStore. |