Agricultural Literacy Curriculum Matrix
Lesson Plan
FoodMASTER Middle: Food Safety
Grade Level
Purpose
Students will understand water-based state changes that occur at varying temperatures, recognize the importance of the proper hand washing technique for general health and disease prevention, understand the factors that impact mold growth and their application to food safety, and explore ways to prevent foodborne illness. Grades 6-8
Estimated Time
Materials Needed
Lab 1:
Teacher Materials:
- Safety goggles
- Apron
- Oven mitt
- Hot plate or double burner
- Thermometer
- Kitchen timer/stopwatch
- 1 medium pot with water filled 1/2-3/4 full
Student Materials (per group of 4-5 students):
- Safe Practices student handout, 1 per student (Key)
- Changing States lab sheet, 1 per student (Key)
- 1 cup of ice chips in a 6-ounce styrofoam cup
- 1 styrofoam cup of water filled 1/2 way
- 1 thermometer
- 1 kitchen timer or stopwatch
Lab 2 Student Materials (per group of 4-5 students):
- Invisible Creatures lab sheet, 1 per student
- Safety goggles
- Aprons (optional)
- Glo GermTM
- 1 UV Light
- Soap
- Access to warm water
- Colored pencils or markers
Lab 3 Student Materials (per group of 4-5 students):
- Multiplying Organisms lab sheet, 1 per student (Key)
- Safety goggles and aprons (optional)
- 1 slice of white bread
- 2 slices of apple
- 2 pieces of cheese
- 1 paper plate
- 1 plastic sandwich bag
- 1 plastic knife
- 1 black permanent marker
- 1 microscope (optional)
- 2-3 microscope slides (optional)
Investigating Your Health Activity:
- Fearless Food Safety student handout, 1 per student (Key)
Essential Files
Vocabulary
aerobic: a chemical reaction that must have oxygen to occur
anaerobic: without the use of oxygen
bacteria: a group of single-celled living things that cannot be seen without a microscope that reproduce rapidly and sometimes cause diseases
celsius scale: a temperature scale characterized by a freezing point of 0 degrees and a boiling point of as 100 degrees
cross contamination: the process by which bacteria is unintentionally transferred from one substance or contaminated object to another
fahrenheit scale: a temperature scale characterized by a freezing point of 32 degrees and a boiling point of 212 degrees
food safety: the practice of handling, preparing, and storing food in a way that prevents food-borne illness
foodborne illness: any illness resulting from the consumption of food contaminated with viruses, parasites, or pathogenic bacteria
germ: a microorganism causing disease
microorganism: any organism, such as a bacterium, protozoan, or virus, of microscopic size
temperature: a measure of kinetic energy of a group of molecules; indirect measure of molecular motion
thermometer: an instrument used for measuring and indicating the temperature of a substance
Did You Know?
- Each year roughly one out of six Americans get sick from a foodborne disease.1
- Everybody from the farm to your fork is responsible for keeping food safe.
- The majority of people will experience a food or water borne disease at some point in their lives, regardless of where they live in the world.2
Background Agricultural Connections
Food safety is handling, storing, and preparing food in ways to keep food safe. Poor food safety can make people sick. Any illness caused by food is called foodborne illness. For this reason, it is important to learn about the science of food safety. Your students can learn about food safety by practicing good food safety and sanitation habits. In this chapter, students will explore food safety concepts by learning how to read thermometers and measuring temperatures, about bacteria that we carry on our hands, potential disease-causing bacteria that can grow on food, and the health benefits of proper food safety practices.
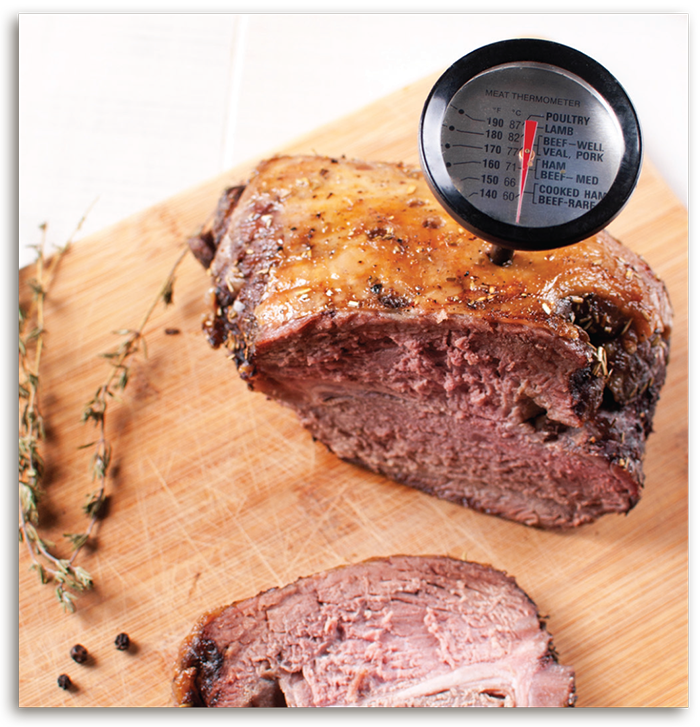
Phase Changes and Temperature Calibration for Food Safety
There are three main states of energy: liquid, solid, and gas. Let’s take water as an example. When water is converted from liquid to solid, the molecules are locked together. They are not able to move around as they did when they were liquid. The molecules become interconnected and are unable to move freely. This process is considered a phase change, which is referred to as freezing. Energy can undergo phase changes when it is converted from one state to another. As another example, when water is converted from liquid to gas it undergoes evaporation. Gas molecules created by this change are able to move more freely. They are no longer slightly touching as in the liquid phase. The molecules are so far apart that they are at least 10 times their diameter apart from other molecules. Energy can also be converted back to its original state. For example, water that has been frozen can undergo another phase change, melting, which will return it to its liquid state.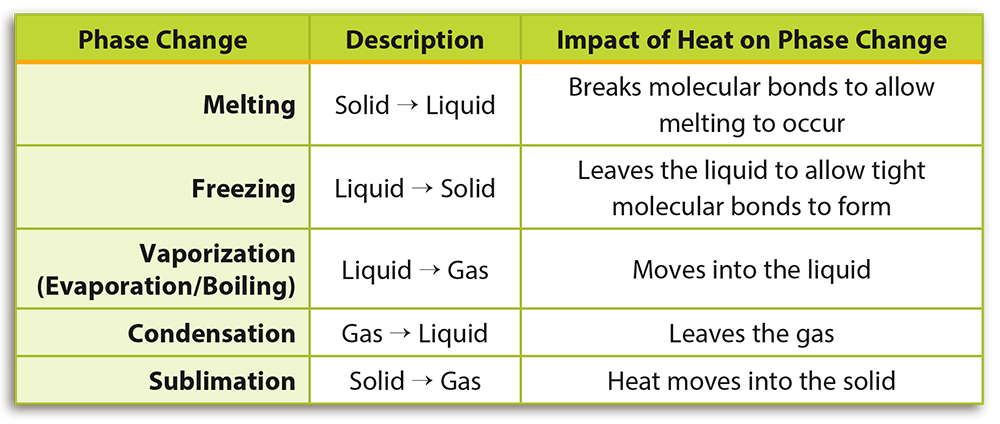
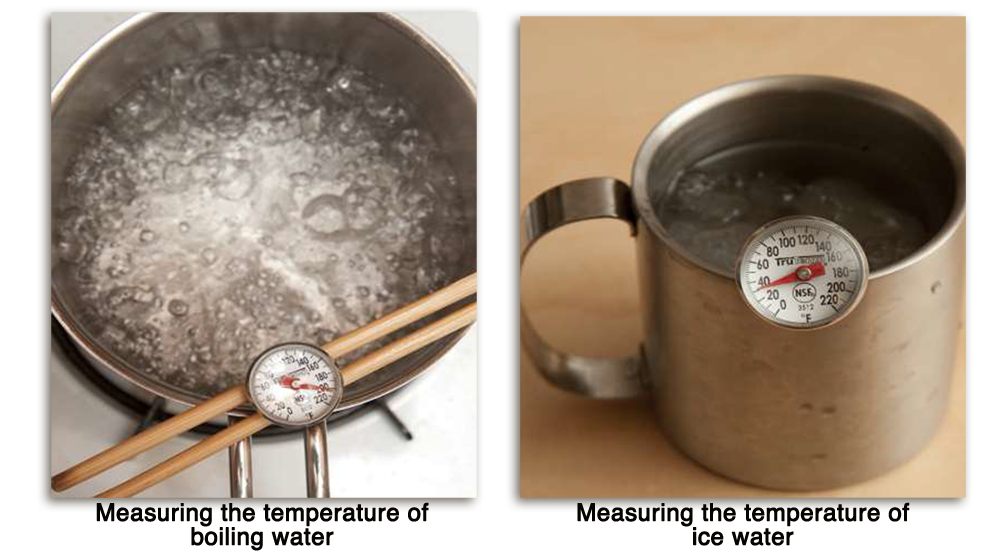
State changes, like melting and vaporization, can be used to calibrate thermometers for cooking. Thermometers must be calibrated to ensure accuracy and ultimately prevent under- or over-cooking food. Consumption of under-cooked food can lead to foodborne illness. For example, consuming chicken before it reaches an internal temperature of 165°F could lead to salmonella poisoning. A thermometer must be calibrated to within +/- 2 °F (1.1 °C) of the actual temperature to ensure accuracy. There are two simple methods used to determine actual temperature: Boiling Water Method and Ice Water Method. A thermometer can be submersed in either boiling or ice water and calibrated to the respective temperature. Boiling water undergoes the process of evaporation. The ice water method involves the process of melting, allowing the heat to break the molecular bonds in the ice to form more liquid and a consistent temperature.
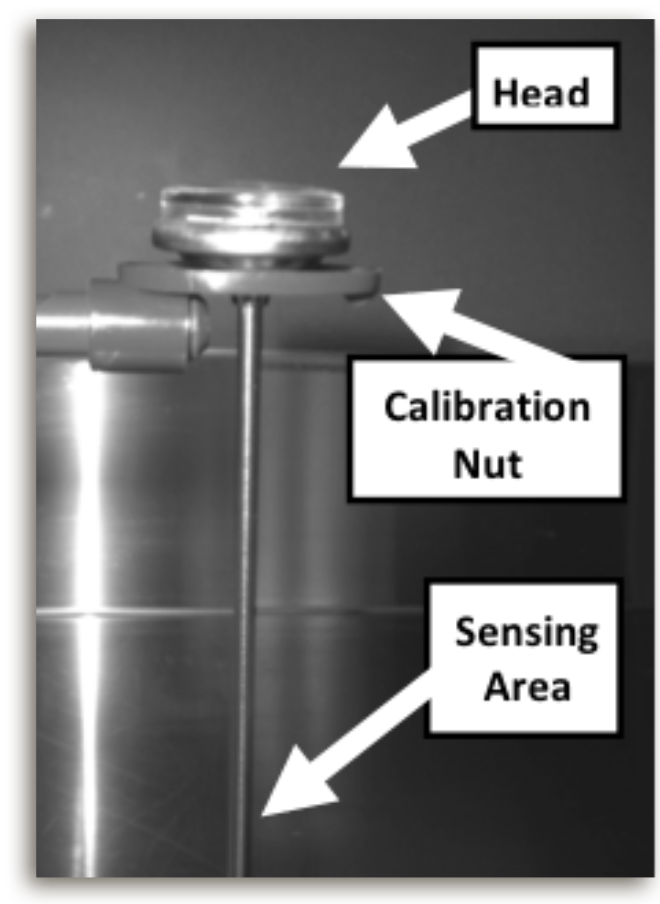
Ice Water Method for Thermometer Calibration
Before measuring temperatures with a bimetallic stemmed thermometer, be sure to calibrate your thermometer first. The easiest way to calibrate your thermometer is with the ice water method:
- Fill a quart-size container with crushed ice and then add a small amount of clean tap water. You should have a lot of ice and only a little water.
- Insert the thermometer so that the whole sensing area (from tip to dimple) is completely submerged for 30 seconds or until the indicator stops moving. (See illustration to the right.)
- If the temperature is at 32°F, the thermometer is ready for use. If the temperature is not at 32°F, then hold the calibration nut (just below the temperature dial) securely with a wrench or other tool and rotate the head of the thermometer until it reads 32°F.
- You should recalibrate the thermometer if you drop or bang it during use.
More Tips on Using a Bimetallic Stemmed Thermometer:
- Before testing temperatures, be sure your thermometer is cleaned, sanitized, and properly dried.
- When checking the temperature of food (e.g. meat), be sure to measure internal temperatures in the thickest part. Be sure the whole sensing area is inserted. The thermometer should not touch bone, fat, gristle or the pan. For thin items such as hamburgers, insert the thermometer from the side into the middle of the meat.
- Cooking temperatures are typically reported using the Fahrenheit scale. The Fahrenheit scale of water is a scale of temperatures ranging from 32° (melting point of ice) to 212° (boiling point of pure water under standard atmospheric pressure).
Proper Cooking Temperatures
- Ground Beef: 160 °F
- Poultry: 165 °F
- Pork: 145 °F
- Fish: 145 °F
- Leftovers: 165 °F
- Casseroles: 165 °F
Microorganisms in Food
Bacteria are single-celled organisms. They are found in everything, including our food. Bacteria do not have a nucleus; rather, they have DNA that forms a nucleoid. We come into contact with bacteria everyday. It is important that we protect ourselves from harmful bacteria by washing our hands. We use our hands all the time, exposing them to harmful bacteria, or germs. Because we use our hands for many purposes, germs can be found all over our hands, including under our fingernails. While bacteria can sometimes be harmful to us, there are other types of bacteria that can be good for our health. For example, a healthy digestive system is full of good bacteria. These bacteria can also be found in food, like yogurt. See Lab 2 in the Milk & Cheese lesson to explore healthy bacteria further. 
There are four main types of microorganisms that can cause disease: bacteria, viruses, molds, and fungi. These microorganisms are also referred to as pathogens. It is important to understand pathogens and how they grow to prevent disease. Bacteria are single-celled microorganisms that can be found in many environments. Some can even thrive in extreme temperatures. Not all bacteria are harmful, but it is important to prevent the spread of harmful bacteria by taking proper food safety precautions. Viruses require a living host, like people or animals, to survive. They only survive to multiply, which is harmful for its host. Molds are multi-celled organisms that can be found on food. Most molds prefer warmer temperatures; however, some molds can survive on salt and sugar, making it easier to survive in colder temperatures. These molds can thrive on foods in the refrigerator, like fruit and salty meats.
There are many factors that can affect microbial growth. To remember what these factors are use the mnemonic device FAT TOM (Food, Acidity, Time, Temperature, Oxygen, Moisture).
Fungi are eukaryotic organisms that are found in soil. Foods such as sweet potatoes, corn, and nuts have been found to grow pathogenic fungi. Food high in protein, like milk and eggs, are more susceptible to microbial growth. To prevent microbial growth, food must not be in the temperature danger zone (40 - 140 °F) for more than two hours. Foods susceptible to microbial growth contain certain nutrients that can be found in protein-rich foods, like milk and eggs. Foods with little to no acidity are considered the best host for pathogen growth; however, bacteria can thrive in a slightly acidic pH (4.6) as well. Most microbes, or pathogens in this case, are aerobic and require oxygen for growth. Those that do not require oxygen are called anaerobic. Foods high in moisture promote microbial growth because many pathogens require water for growth. In the end, molds can be harmful or beneficial. Harmful molds grow on the surface of dry foods like bread. Beneficial molds grow inside of foods, like Blue cheese.
FoodMASTER Middle Lessons
FoodMASTER (Food, Math and Science Teaching Enhancement Resource) is a compilation of programs aimed at using food as a tool to teach mathematics and science. For more information see the Background & Introduction to FoodMASTER for Middle School. This lesson is one in a series of lessons designed for middle school:
Engage
- To introduce the lesson, begin by drawing on your student's prior knowledge. Ask them, "What principles do you follow at home in order to keep your food from spoiling or making you sick?" If necessary, use more guiding questions for students to identify that they keep some food in the refrigerator, they put groceries in the fridge/freezer as soon as they get home from the store, they cook foods thoroughly, etc.
- Next, establish with your students that most foods they eat on a daily basis are grown or raised on a farm. Tell your students that you are going to call out a food item. After you call out the food, they are to respond by echoing back to you the name of the animal (or plant) that produces that food. For example, the teacher calls out, "Milk" and the students will respond by saying, "Cow." Repeat this process for several food items such as:
- Hamburger (Cattle)
- Bacon (Pigs)
- Bread (Wheat)
- Sugar (Sugarbeets or sugar cane)
- Eggs (Chickens)
- Yogurt (Cows)
- Chicken (Chicken nuggets or chicken fingers)
- Cheese (Cows)
- Corn flour (corn)
- Sausage (Pigs)
- Draw a flow diagram on the board showing the "Farm to Fork" path of the majority of our food. Teach students that keeping our food safe begins on the farm. Give a brief description of each step along the way using the notes below.

- Farm: Farmers take good care of their animals and crops. They follow guidelines and practices to produce food that is healthy and safe. Dairy farmers cool their milk immediately and store it in a refrigerated tank to minimize the growth of bacteria that could make us sick. Farmers also work hard to keep their farm and equipment clean and sanitized to stop the spread of harmful bacteria.
- Processing Plant: The processing plant is where a raw food product is prepared for retail sale. For example, milk is pasteurized, homogenized and processed into butter, cheese, ice cream or other dairy products at a processing plant. Meat can be cut and packaged at a processing plant or made into hamburger, sausage or sandwich meat. Processing plants have strict guidelines for sanitation and cleanliness to keep our food safe. Workers wear hair nets and clean, protective clothing.
- Grocery Store: Most consumers purchase their food from a retail grocery store. Grocery stores ensure that food is kept at the proper temperature and that it is not kept on the shelf too long.
- Your Home: Today, students will be learning what they can do at home to help keep their food safe and healthy.
- Once students can visualize the farm to fork process, ask them the following questions:
- How can temperature play a role in food safety
- How does bacteria (unicellular organisms) play a role in spreading disease?
- How can foodborne illness be prevented?
- Inform students that they will be learning the answers to these questions.
Explore and Explain
Food Exploration Lab 1: Changing States
Teacher Preparation:
- Review information found in the Background Agricultural Connections section of the lesson, lesson procedures (Explore and Explain), and the attached Essential Files.
- Prepare the following for each group:
- Styrofoam cup of water (filled half way) that has reached room temperature
- Consider identifying one student group to help you with the teacher demonstration (e.g. set-up, recording data on the board).
- You may use Celsius or Fahrenheit thermometers in this lab. Example answers are reported in Fahrenheit.
- Consider providing your students with time to practice using Celsius and/or Fahrenheit thermometers correctly prior to beginning the lab.
Teacher Procedures:
- Distribute materials. It is recommended that materials are organized into stations for easier distribution. Students should be arranged in small groups of 4-5. Each group should receive the lab supplies outlined in the Materials section of this lesson and one copy of the Safe Practices student handout and Changing States lab sheet.
- Ask students to read Safe Practices (page 1-2) and complete the "Think About It" questions (page 3) for this lab investigation.
- Prepare to begin the lab investigation by requiring students to wash their hands and emphasizing the importance of practicing good food safety behaviors by not consuming substances used as part of the lab investigation.
- Launch the lab by showing the demonstration video or providing a teacher-led demonstration as outlined below. The demonstration should show students how to calibrate a thermometer using the Boiling Water Method. Students will also observe temperature and state changes that occur when water is heated.
- Fill a medium pot half way with room temperature water. Insert a thermometer to measure the temperature of the water prior to heating. The thermometer should not touch the sides or bottom of the pot when measuring the temperature of the water. Also, be sure to keep the thermometer immersed in the water when taking the temperature. Remind students to practice this as well.
- Turn on a burner and begin to warm the pot of water. Set your timer for 10 minutes.
- Describe and show students how to read a thermometer during your demonstration.
- Important Note: Be careful when handling the thermometer. Due to heat transfer from the boiling water, the thermometer may be hot to touch. For safety, use an oven mitt when reading the thermometer.
- Measure the temperature of the water every two minutes for 10 minutes (water needs to be heated to the boiling point). Have students record these temperatures in their lab notes.
- Once the water reaches a rolling boil, wait 30 seconds and then read the temperature on the bimetallic thermometer. At sea level, the temperature should read 212°F while still submerged in the boiling water. If you are cooking at a higher altitude, water will boil at a slightly lower temperature due to the reduced air pressure. For example, at 2,000 feet above sea level, the boiling temperature of water is 208°F. If the thermometer reads a different temperature, adjust the thermometer to read the correct temperature. If you are unable to calibrate your thermometer simply add or subtract the difference (actual temperature +/- 32F). For more information on calibrating a bimetallic stemmed thermometer see information found in the Background Agricultural Connections section of this lesson.
- As the water heats to boiling, your class should observe an increase in the water’s temperature. Once the water reaches a rolling boil, the temperature should read 212°F or 100°C if the thermometer was properly calibrated. Additionally, students should begin observing water changing from a liquid state to a gaseous state.
- Show students the Food Safety-Changing States lab video for a demonstration of what they will complete in their lab. Allow students to begin their lab investigation. Students will use the Ice Water Method to determine if a thermometer is calibrated correctly and to observe temperature/state changes.
- After mixing room temperature water with ice, students should begin to observe a decrease in the water’s temperature. After several minutes, the temperature should read approximately 32°F or 0°C (freezing) if the thermometer was properly calibrated. Students may not observe any immediate state changes; however, the warmer temperature of the water will cause the ice chips to slowly melt from a solid to a liquid. By the end of the class, students should clearly see this state change.
- Allow students to work in small groups to complete the remaining pages of their lab sheet.
- Follow-up with a class discussion about the importance of using accurate tools and methods of measurement. Remind students about the role temperature plays in food preparation and the prevention of foodborne illness.
Food Exploration Lab 2: Invisible Creatures
Teacher Preparation:
- Review information found in the Background Agricultural Connections section of the lesson, lesson Procedures, and the attached Essential Files.
- Prepare materials for each group. Note the following:
- Student groups can share the Glo Germ™ and UV light.
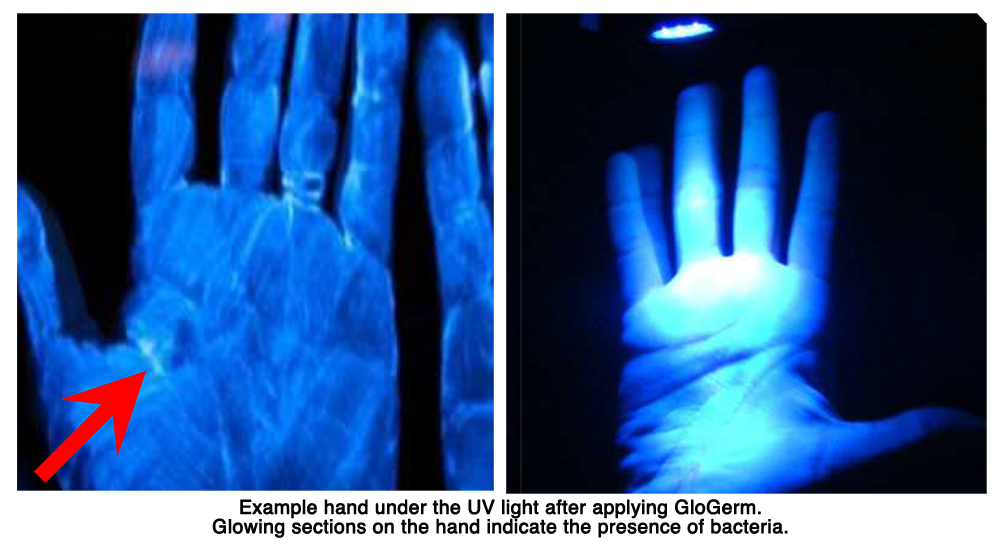
- Glo Germ™ is a liquid, gel or powder that contains plastic simulated bacteria. The UV light will illuminate the simulated bacteria to allow students to test the effectiveness of their hand washing practices. It is important for students to understand the glowing bacteria on their hands are not real bacteria, but rather simulated bacteria from the Glo GermTM product.
- Glo Germ™ only works with a UV light, and simulated bacteria are best observed in a darkened room. Guide students through the procedure together, so that the room can be darkened during periods of observation.
- If you do not have access to a sink in your classroom, consider assigning 1-2 students (or 1 student per group) to participate in the hand-washing portion of the lab. These students can return to the classroom and demonstrate the remaining portions of the lab.
Teacher Procedures:
- Distribute lab supplies outlined in the Materials portion of the lesson. It is recommended that students be divided into groups of 4-5 and be organized into stations. Each student should also have one copy of the Invisible Creatures lab sheet.
- Note: Be sure students have already read Safe Practices and completed the "Think About It" questions as outlined in Lab 1.
- In this lab, students should not wash their hands prior to beginning the lab investigation.
- Launch the lab by asking students to respond to the investigation question at the bottom of page 1 of their Food Safety Student Handbook about where bacteria are most concentrated on their hands.
- Following their predictions, students should put a small amount of the Glo Germ™ on their hands (about the size of a nickel). Students should rub the gel all over their hands, including between their fingers and around the nails and thumbs. After applying the gel, the whole hand should glow under the UV light, showing that we can have germs all over our hands. Students should see the following:
- Palm: The palm of the hand should show simulated bacteria. The bacteria will likely be concentrated within the creases of the palm.
- Finger Nails: Fingernails should show a large concentration of simulated bacteria, particularly around the bed of the nail.
- Wrist: The wrist should show some simulated bacteria, particularly on the underside.
- Fingers: Fingers may show some simulated bacteria, especially within the creases of the knuckles.
- Thumb: The thumb should show a good amount of simulated bacteria present.
- Instruct the students to wash their hands using warm water and soap.
- After the hand washing, students should again view their hand under the UV light. Many may still observe a large amount of bacteria present around the nail bed, on the wrist, and the back of the hand. These are areas people tend to forget about when washing their hands.
- Allow students to work in small groups to complete the lab sheet and respond to lab questions.
- Follow-up with a class discussion about the importance of proper hand washing for preventing the spread of bacteria.
Food Explorations Lab 3: Multiplying Organisms
Teacher Preparation:
- Review information found in the Background Agricultural Connections section of the lesson, lesson Procedures, and the attached Essential Files.
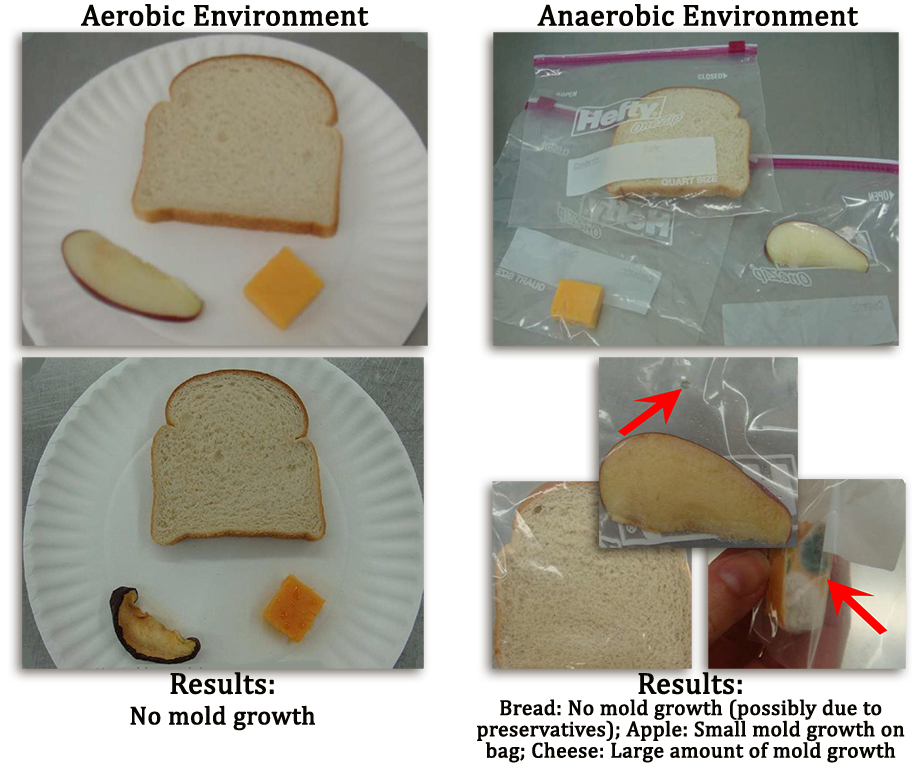
- Prepare the food samples for each group. Food samples may take as long as three weeks to grow mold. Preservatives can negatively impact mold growth. However, organic or home baked (i.e. bread) versions of food may produce more mold, more quickly. If leaving food out on paper plates is problematic, you may place these samples in plastic bags or a cardboard box. However, make sure the bag or box has good airflow. The aerobic food samples need to be exposed to air.
- Timesaver: Prepare food samples ahead of time for student observation and quicker lab completion. You may also consider having one set of samples for the entire class versus each group.
Lab Procedures:
- Distribute lab supplies outlined in the Materials portion of the lesson. It is recommended that students be divided into groups of 4-5 and be organized into stations. Each student should also have one copy of the Multiplying Organisms lab sheet.
- Note: Be sure students have already read Safe Practices and completed the "Think About It" questions as outlined in Lab.
- Prepare to begin the lab investigation by requiring students to wash their hands and emphasizing the importance of practicing good food safety behaviors by not consuming substances used as part of the lab investigation.
- Launch the lab by asking students to respond to which food type and environment (aerobic or anaerobic) will produce the most mold growth. Through the course of the lab, students will likely observe the following:
- Aerobic: Some mold growth may be observed on the foods that were exposed to the aerobic environment. The foods should be dry and in some cases smaller in size due to the loss of moisture content.
- Anaerobic: A significant amount of mold growth should be observed on the foods that were exposed to an anaerobic environment. The most mold growth will likely occur on the cheese.
- Show students the Food Safety- Multiplying Organisms video to provide a demonstration of what they will be doing in the lab. Allow students to work in small groups to complete the lab sheets and respond to lab questions.
- Follow-up with a class discussion about mold growth on food and its relevance to food safety.
Investigating Your Health: Fearless Food Safety
- Give each student 1 copy of the Fearless Food Safety worksheet and assign students to complete. This activity is designed to be completed as homework or in class.
- See the attached Teacher Key for answers to the lab questions.
- If completed in-class, allow students to work in small groups on the worksheet to further explore the topic and respond to questions.
- Follow-up with a class discussion about the importance of hand washing and student generated ideas for preventing foodborne illness.
Elaborate
-
Use the calibrated thermometers to explore state changes in other substances.
-
Explore factors that can impact state changes (i.e. the addition of salt to ice or boiling water).
-
Explore the different boiling points of various liquid substances.
-
Use petri dishes to grow bacteria obtained on the body or from various surfaces in the school environment.
-
Explore how temperature impacts mold growth.
Evaluate
After conducting these activities, review and summarize the following key points:
- Substances undergo a phase change when they are converted from one state to another. Examples include freezing, evaporating, and melting.
- A properly calibrated thermometer should be used to check the cooking temperatures of meat to decrease the chances of foodborne illness.
- Bacteria, viruses, molds, and fungi are all microoganisms that can cause disease.
- Proper food safety procedures decrease the chances of foodborne illness.
Sources
- http://www.eatright.org/resource/homefoodsafety/safety-tips/food-poisoning/food-safety-facts-and-figure
- http://www.huffingtonpost.co.uk/2015/04/07/food-safety-world-health-day-2015_n_7017884.html
Acknowledgements
This lesson was partnered with East Carolina University. The FoodMASTER program was supported by the Science Education Partnership Award (SEPA) which is funded from the National Center for Research Resources, a component of the National Institutes of Health.
- Primary Authors:
- Virginia Stage, PhD, RDN, LDN
- Mary White
- Ashley Roseno, MAEd, MS, RDN, LDN
- Melani W. Duffrin, PhD, RDN, LDN
- Graphic Design: Cara Cairns Design, LLC
Recommended Companion Resources
- Dirt to Dinner
- Eat Happy Project Video Series
- Food Safety from Farm to Fork: How Fast Will They Grow?
- Food Safety from Farm to Fork: Mighty Microbes
- Food Safety from Farm to Fork: Operation Kitchen Impossible
- Food Safety from Farm to Fork: Playing it Safe
- Germ Stories
- Glo Germ Set
- Virtual Food Safety Labs
- Virtual Labs: Understanding Water Activity
Author
Organization
| We welcome your feedback! If you have a question about this lesson or would like to report a broken link, please send us an email at matrixelearning@gmail.com. If you have used this lesson and are willing to share your experience, we will provide you with a coupon code for 10% off your next purchase at AgClassroomStore. |
