Agricultural Literacy Curriculum Matrix
Lesson Plan
A is for Apples
Grade Level
Purpose
Students use their five senses to investigate apples, identify and model the parts of an apple, make applesauce, and discover how apples are grown. Grades K-2
Estimated Time
Materials Needed
Engage:
- Up, Up, Up! It's Apple-Picking Time by Jody Fickes Shapiro
Activity 1: Five Senses Apple Investigation
- Red, yellow, and green apples
- Cutting board
- Knife
- 5 Senses Chart, 1 per student
- Red, yellow, and green interlocking cubes
- Apple Book Template
- Red, yellow, or green card stock, 2 pieces per student
- Lined paper, 5 pieces per student
- Hole punch
- Ribbon
Activity 2: Identifying Parts of an Apple
- Apple
- Cutting board
- Apple slicer
- Knife
- 1 set of Apple Parts Cards
Activity 3: Apple Model
- Example of Apple Model (make your own following the instructions in Activity 3)
- 4.5" (11.43 cm) x 9" (22.86 cm) yellow, red, or green construction paper
- 5" (12.7 cm) x 9" (22.86 cm) white construction paper
- 1" (2.54 cm) x 3" (7.62 cm) brown construction paper
- Brown, green, and black construction paper
- Glue sticks
- Apple Parts Cards, 1 set per student
Activity 4: Making Applesauce
- Slow Cooker
- Crock Pot Applesauce recipe
- Apple peeler corer slicer
- 8 tart apples
- 1 cup (140 g) sugar
- 1 teaspoon (4 g) cinnamon
- 2 cups (480 mL) water
- 2 tablespoons (30 mL) lemon juice
- Liquid measuring cup
- Teaspoon
- Wooden spoon
- Plastic cups, 1 per student
- Plastic spoons, 1 per student
Vocabulary
calyx: what is left of the apple blossom
flesh: the pulpy substance of a fruit or vegetable, especially the part that is eaten
orchard: a place where fruit or tree nuts are grown
seed: the part of a flowering plant that contains an embryo within its protective coat and a stored food supply
skin: covers and protects the apple's flesh and seeds
stem: the main supportive part of a plant; part of the transport system carrying water from the roots and food produced during photosynthesis to other parts of the plant
Did You Know?
- On average, Americans eat more apples than any other fruit.2
- It takes about 36 apples to create one gallon (3.78 L) of apple cider.2
- 25% of an apple's volume is air; that's why they float in water.2
Background Agricultural Connections
The average American consumes approximately 65 apples a year. There are over 7,500 varieties of apples in the world and about 2,500 varieties are grown in the United States. Apples are the fruit of apple trees. They have green, red, pink, or yellow skin and are used to make apple juice, cider, vinegar, applesauce, and many kinds of salads and desserts.
Apple trees grow in all 50 states, but for efficient fruit production they require a cold period called vernalization. Vernalization takes place during the cold winter months while an apple tree is dormant. Without this cold period, apple trees will not develop sufficient flower buds to produce a good crop of apples. The top three apple producing states in the US are Washington, New York, and Michigan.1 All three of these states have a significant winter season.
Apple trees are not typically grown from seed because it takes about 15 years for an apple tree grown from seed to produce an apple. Instead, most apple trees are grown by budding or grafting onto rootstocks—sections of tree roots still attached to a part of the tree trunk. Budding involves taking one bud from an existing tree branch and attaching it under the bark of a rootstock with special grafting tape or glue. Grafting is similar, but rather than a single bud, a section of a stem with multiple leaf buds is attached to the rootstock with grafting glue and tape. Grafted or budded trees usually grow in a nursery for about one year before being planted in an orchard.
An apple can be divided into several parts. The skin covers and protects the apple’s flesh and seeds. The flesh is the sweet part of the apple. The stem is what attaches the apple to the apple tree, bringing water and nutrients to the apple. The seeds can be used to grow new apple trees. The calyx is what is left of the apple blossom.
Honeybees are commonly used to pollinate apple trees. Almost all varieties of apples require cross-pollination, meaning that pollen from a different variety is needed to produce fruit. Apple trees require full sunlight and well-drained soil. Most apples are ready to harvest in the late summer or early fall.
We’ve all heard the saying, “An apple a day keeps the doctor away.” While eating apples does not guarantee good health, apples do have healthy benefits. Apples are naturally fat-, sodium-, and cholesterol-free and are an excellent source of dietary fiber and antioxidants. A medium apple contains about 80 calories and is loaded with vitamin C and beta-carotene. Be sure to eat the skin. Most of the fruit’s antioxidants, vitamin C, and fiber are located in, or just under, the skin.
Engage
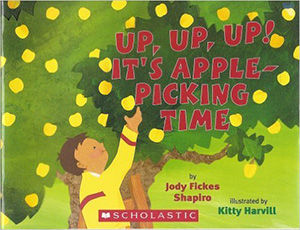 Read the book Up, Up, Up! It's Apple-Picking Time by Jody Fickes Shapiro. As you read, discuss the following questions with the students:
- Where do apples grow?
- What colors can apples be?
- What are apples used for?
- After reading the book and answering the questions, transition to Activity 1 by telling students they will be learning more about about apples and their senses.
Explore and Explain
Activity 1: Five Senses Apple Investigation
- Before beginning this activity, students should wash their hands.
- Ask students to identify their five senses—see, smell, feel, hear, taste. Explain that they will be using their five senses to observe apples. Give each student a 5 Senses Chart.
- Show students the three different types of apples. Ask them to describe what they see. Point out the skin, stem, and calyx. The calyx is the remaining part of the apple blossom located on the end of the apple opposite of the stem. Cut an apple in half crosswise. Ask the students to describe what they see. Point out the shape of the star, the seeds in the star pockets, and the flesh. Write their descriptive words on the board (as pictured) under the “See” column. Explain that descriptive words are called adjectives. The students should choose at least two adjectives to write on their own 5 Senses Chart. At the end of the activity, they will use the adjectives on their chart to write a poem about apples.
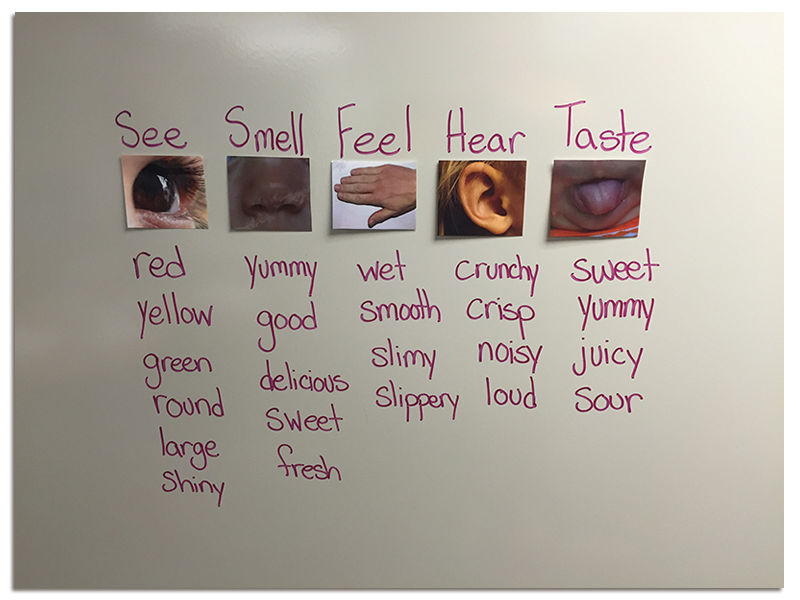
- Cut each apple into slices. Give a green, red, and yellow slice to each student. Ask them to smell the apples and describe what they smell. Write their adjectives on the poster under the “Smell” column and have them write at least two adjectives on their chart.
- Ask the students to feel the apple slices and describe what they feel. Write their adjectives on the poster under the “Feel” column and have them write at least two adjectives on their chart.
- Ask the students to take a bite out of one apple slice and describe what they hear. Write their adjectives on the poster under the “Hear” column and have them write at least two adjectives on their chart.
- Ask the students to taste each slice of apple and describe what they taste. Write their adjectives on the poster under the “Taste” column and have them write at least two adjectives on their chart.
- Ask the students to vote on whether they like red, green, or yellow apples best by choosing a red, yellow, or green interlocking cube. Stack the cubes together by color, and create a bar graph to show the preferences of the whole class.
 Each student will choose adjectives from their 5 Senses Chart to create a poem about apples. For each sense, they will write a sentence about the apples they were able to see, smell, feel, hear, and taste. Using the “Apple Book” template, cut a front and back cover and five pages. Write each sentence on one page of the book. Secure the book using a hole punch and ribbon.
Activity 2: Identifying Parts of an Apple
- Prior to class, print and cut out one set of the Apple Parts Cards to use as labels throughout this demonstration. Explain to the students that they are going to learn about the different parts of an apple.
- Cut an apple with an apple slicer. Peel the skin off of one slice. Ask students what it is. Explain that the skin covers and protects the apple’s flesh and seeds. Label the skin by placing it next to the “skin” card.
- Show the students the peeled apple slice’s flesh. Explain that the flesh is the sweet part of the apple that you can eat. Place the flesh by the “flesh” card.
- Pull the stem off of the apple core. Ask students what it is. Explain that the stem is what attaches the apple to the apple tree, bringing water and
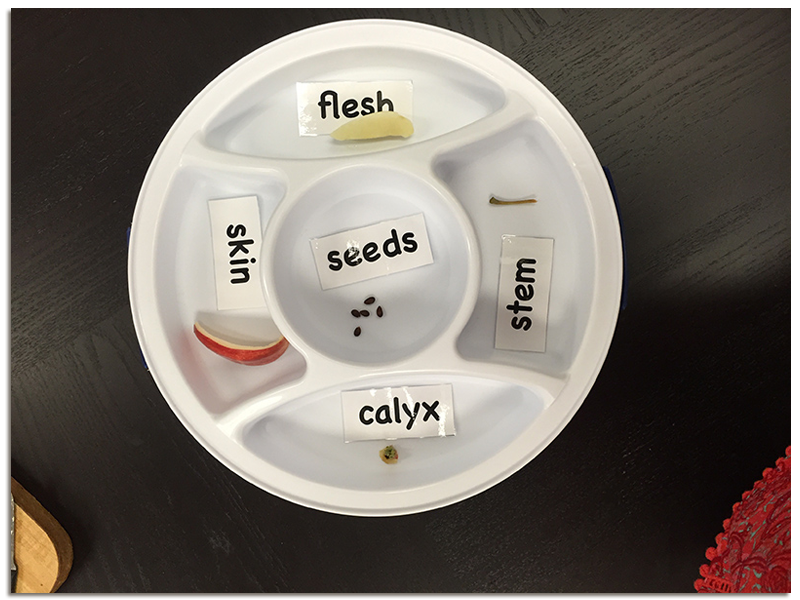 nutrients to the apple. Place the stem by the “stem” card.
 - Pull some seeds out of the core. Ask the students what they are. Explain that the seeds can be used to grow new apple trees. It takes a long time to grow a new apple tree from seeds. Place the seeds by the “seed” card.
- Slice the bottom off of the core. Show the students the calyx. Explain that apples develop from flowers. The calyx is what is left of the apple blossom. Place the calyx with the "calyx" card.
Activity 3: Apple Model
- Explain to the students that they will be making a paper model of the parts of an apple.
- Show the students the example model. Point out each part reviewing what was taught in Activity 2. The skin covers and protects the apple’s flesh and seeds. The flesh is the sweet part of the apple. The stem is what attaches the apple to the apple tree, bringing water and nutrients to the apple. The seeds can be used to grow new apple trees. The calyx is what is left of the apple blossom.
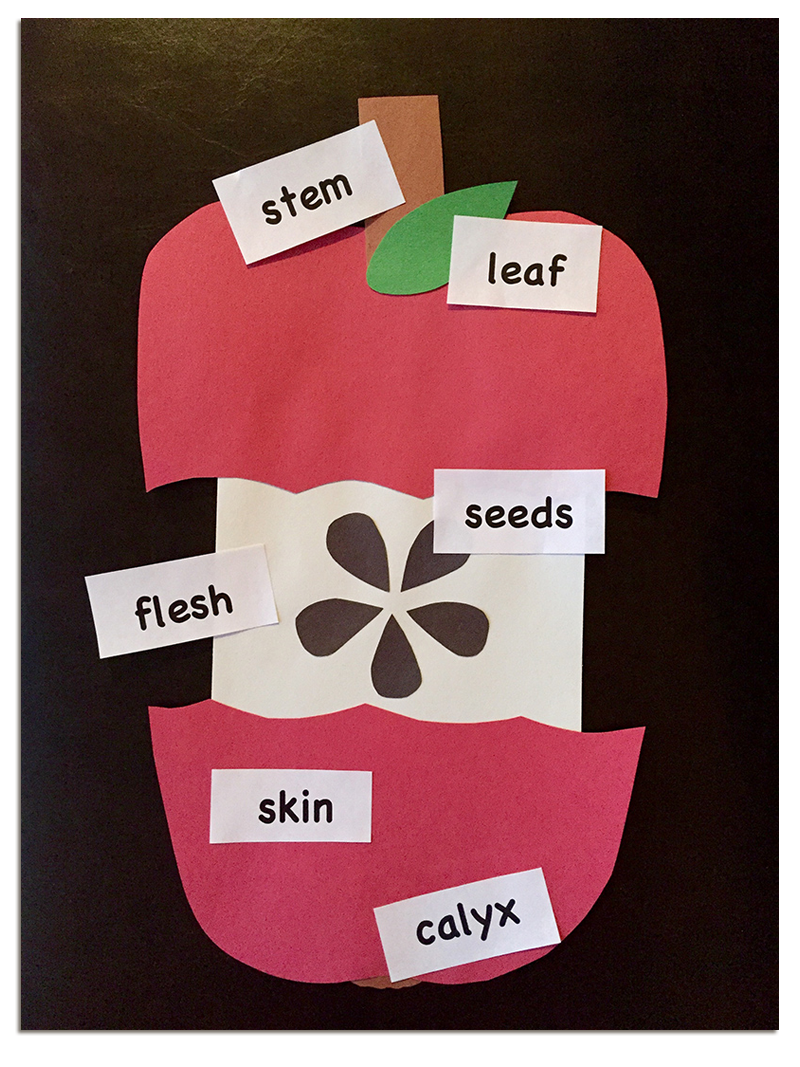
- Give each student two pieces of either red, yellow, or green construction paper. Have them cut the top and bottom shape of an apple and bite marks on the straight lines to represent the apple’s skin. Glue the colored papers on each end of the white rectangle, which represents the apple’s flesh.
- Glue the brown rectangle on top of the apple to represent the stem. Cut the green paper into the shape of a leaf and attach it to the bottom of the stem.
- Cut a brown piece of paper to form the shape of a calyx and glue it onto the bottom of the apple.
- The black paper can be cut into the shape of seeds and attached to the flesh of the apple.
- Cut out the Apple Parts Cards. Read the cards together and have the students label each part of their apple by gluing the cards in place.
Activity 4: Making Applesauce
- Before beginning this activity, students should wash their hands.
- Explain to the students that apples are used to make apple juice, cider, vinegar, applesauce, and many different kinds of salads and desserts. Today they will be making and tasting homemade applesauce.
- Explain the process of making applesauce to the students. Show the students the applesauce recipe, pointing out the ingredients list and directions.
- The apples need to be peeled, cored, and sliced. Show the students how the apple peeler corer slicer works and which parts are sharp. Allow students to take turns using it to peel, slice, and core the apples.
- Allow students to place the apples into a large slow cooker and mix in cinnamon and sugar. Several students can take turns mixing with a wooden spoon. Pour water and lemon juice over the apples. Cook on high for 3–4 hours until the apples are soft. Your classroom will smell wonderful!
- When the apples are ready, allow students to take turns mashing the apples into applesauce using the potato masher. Give each student a cup of applesauce to taste.
Elaborate
-
View the video How Apples are Grown and Harvested to learn more about the apple growing and harvesting process.
Evaluate
After conducting these activities, review and summarize the following key concepts:
- Apples are a fruit that can be eaten fresh or made into applesauce, apple cider, or apple juice.
- Apples grow on trees.
- An area where apple trees grow is called an orchard.
- The five senses are sight, smell, hearing, touch, and taste.
Sources
- http://www.usapple.org/index.php?option=com_content&view=article&id=179&Itemid=285
- http://www.nyapplecountry.com/about/fun-facts
Recommended Companion Resources
- Apples
- Apples
- Apples
- Apples for Everyone
- Apples to Oregon
- Applesauce Day
- Bring Me Some Apples and I'll Make You a Pie
- Building with Apples
- Farm Pop-Ups
- From Apple Trees to Cider, Please!
- From Apples to Applesauce
- Fruit Bowl
- George the Farmer
- Harvesting for a Healthy Community Farm to School Resources
- How Do Apples Grow?
- How to Grow an Apple Pie
- Johnny Appleseed
- My Family's Farm Book Series
- No Ordinary Apple: A Story About Eating Mindfully
- Our Apple Tree
- Seed by Seed: The Legend and Legacy of John "Appleseed" Chapman
- The Apple Orchard Riddle
- The Apple Pie Tree
- Tree Fruits Flowchart
- Up, Up, Up! It's Apple-Picking Time
Author
Organization
 |
We welcome your feedback! If you have a question about this lesson or would like to report a broken link, please send us an email. If you have used this lesson and are willing to share your experience, we will provide you with a coupon code for 10% off your next purchase at AgClassroomStore. |