Agricultural Literacy Curriculum Matrix
Lesson Plan
My Little Seed House and Seed Book
Grade Level
Purpose
Students observe the growth and development of seeds and explore what conditions are necessary for seeds to germinate. Grades K-2
Estimated Time
Materials Needed
Activity 1: Seed House and Seed Book
- The Tiny Seed written by Eric Carle
- Seed House activity sheet, 1 per student
- Packets of seeds, 1 per student
- Ziploc bags, 1 per student
- Cotton balls
- Spray bottle with water
- Scissors
- Stapler
- Rubber bands, 1 per student
- Plain paper, 1 sheet per student
- The Tiny Seed activity sheet, 1 per student
- Growing Plants Songs handout
Activity 2: Recycled Seed Paper
- 8 sheets of 8.5" x 11" white paper; shredded
- 2 sheets of 8.5" x 11" colored paper; shredded
- Large bowl of water
- Blender
- Strainer
- 2 packets of small seeds
- 2 dish towels
- 2 linen towels
- Rolling pin
Vocabulary
germination: process of a plant emerging from a seed and beginning to grow
Background Agricultural Connections
A seed is the start of a new plant. Seeds are covered in a seed coat that keeps the tiny leaves and roots inside safe from harm. A seed contains food for the new plant to use until it grows big enough to reach sunlight and the plant can make its own food. A seed’s germination is dependent upon moisture, temperature, and light. Many of the foods we eat come from plants, and most of these plants start out as seeds. Farmers plant seeds to grow everything from the tomatoes that are made into spaghetti sauce to the wheat that is made into bread to the watermelon that you eat at a picnic. A seed can be both the start of a new plant and the start of a new meal!
Engage
- Ask the students if they can think of any foods that come from plants. Allow students to list several.
- Next ask, "Where do the plants we eat come from?" Explain that many of them begin as seeds planted on farms.
- Ask, "What does a seed need to grow?" Inform students that they will be learning more about the answer to this question today.
Explore and Explain
Activity 1: Seed House and Seed Book
- Read The Tiny Seed by Eric Carle with the students. Ask the students to recall what the tiny seed needed to survive and grow into a giant flower. What conditions do seeds need to germinate and grow? Discuss the connection between planting seeds and growing food.
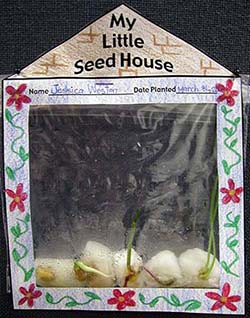
- Tell the students that they will be making seed houses to grow seeds in and seed books to document their observations of the growing seeds. Show them a completed model seed house.
- Hand out the Seed House activity sheets, seed packets, Ziploc bags, and cotton balls.
- Instruct the students to color and cut out the frames of their seed houses.
- Next, they should moisten the cotton balls with water, place them in the plastic bag, and place the seeds on the cotton balls.
- Close the bag and staple it onto the frame of the seed house.
- Note: The seeds should be showing on the front of the house. Any remaining seeds can be sent home for the students to plant with their families or used in Activity 2 if the seeds are small.
- Tell the students that they will now create their seed books.

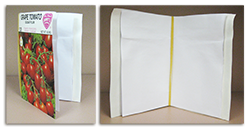
- Using the packet that the seeds came in, cut the top, bottom, and right sides so that the packet opens up like a book with the plant picture on the front cover.
- Ask students to cut their paper so that it is the same height and double the length of the seed packet. Then, fold it in half so that it fits inside the packet.
- Add the pages to the book by using a rubber band to secure the middle of the pages against the spine of the book.
- Complete The Tiny Seed activity sheet.
- Sing the Growing Plants Songs together as a group.
- As the seeds begin to sprout in the seed house, have students make drawings of the seedlings in their seed books.
Activity 2: Recycled Seed Paper
- Discuss the concept of recycling with the students. Recycling is the process of changing waste into a new, useful material. Explain to the students that they are going to recycle paper and make new paper that can be planted. They will be putting seeds into their new paper. They will be able to plant the paper in soil, and if they provide the seeds with the conditions they need, new plants will begin to grow.
- Show the students some of the seeds they will be putting into their seed paper, and ask them why a plant isn't growing. Explain that seeds do not begin growing until certain conditions are met; when a seed begins to grow, we call that germination. Ask the students what they think a seed needs to germinate. Tell them that a seed needs oxygen and the proper moisture and temperature to germinate.
- Explain to the students that the seeds they will be putting into their seed paper will not begin to grow until they are warm enough and get the water they need.
- To make the recycled seed paper, soak the shredded paper in a bowl of water for at least one hour to help the paper soften and break apart easily.
- Scoop the paper into a blender. Add two cups of the soaking water and blend for about two minutes until you get a mushy pulp.
- Pour the pulp through a strainer to remove some of the water. Do not squeeze all of the water out or the paper will not form together well.
- Gently mix the seeds in.
- Spread a dish towel out on a flat surface. Place a linen towel on top of the dish towel. The linen towel will keep the small seeds from sticking to the absorbent dish towel.
- Spread the pulp out onto the linen towel and flatten it down with your hand.
- Place another linen towel and dish towel on top of the pulp and use a rolling pin to further flatten the paper.
- Allow the paper to dry overnight.
- After drying, the paper can be cut into desired shapes and made into cards and bookmarks.
- To plant, rip the seed paper into small pieces and spread throughout a garden or pot filled with soil. Cover the paper with about one inch of soil and water regularly.
Elaborate
-
Use the hands-on activities in the Nuts About Peanuts! lesson plan to further explore the parts of living things and other life science concepts.
Evaluate
After conducting these activities, review and summarize the following key concepts:
- Plants provide food in the form of fruits, vegetables, and grains.
- Most plants begin their cycle of growth as a seed.
- Seeds need warmth, moisture, and air to germinate.
Acknowledgements
Activity 1 adapted from USOE Teacher's Resource Book.
Recommended Companion Resources
- A Fruit is a Suitcase for Seeds
- A Green, Green Garden
- A Seed in Need: A First Look at the Plant Cycle
- A Seed is Sleepy
- A Seed is the Start
- Garden Planner
- How Groundhog's Garden Grew
- Las espinacas de Sylvia (Spanish Edition)
- Pumpkin Circle: The Story of a Garden
- Sadie's Seed Adventures: Learning About Seeds
- Seed, Soil, Sun: Earth's Recipe for Food
- Seeds Go, Seeds Grow!
- SpaceLite (Plant Light)
- Sprouting Success
- Sunflower House
- Sylvia's Spinach
- The Curious Garden
- The Extraordinary Gardener
- The Tiny Seed
- Tops & Bottoms
- Up, Down, and Around
- Weslandia
Author
Organization
| We welcome your feedback! If you have a question about this lesson or would like to report a broken link, please send us an email. If you have used this lesson and are willing to share your experience, we will provide you with a coupon code for 10% off your next purchase at AgClassroomStore. |
