Agricultural Literacy Curriculum Matrix
Companion Resource
Shape, Form, and Function in the Garden
In this activity students will gather, observe, and dissect flowers before collecting flowers and other plant parts to create pressed plant art. Use this activity to integrate art and science concepts while encouraging students to explore and observe plants found in their everyday surroundings.
Time to Complete
2-3 hours
Materials
- Paper or reclosable bag, 1 per student
- Scissors, 1 pair per student
- Tape
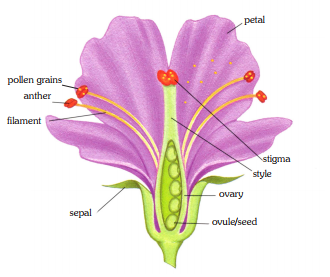
- The Basic Parts of a Flower page, 1 per 3-4 students
- Parts of a Flower Poster
- Plant press, 1 per 2-3 students
- You may purchase a commercial plant press
- Or make your own using newspaper, cardboard, and books or another heavy weight
- Source of flowers and vegetation (garden, schoolyard, park)
- Spray-on rubber cement (photo adhesive)
- Poster board 8.5” x 11”
- Inexpensive frames (optional)
Procedures
- Provide each student with a paper or reclosable bag, and a pair of scissors. Ask the students to go into the garden (or a park or schoolyard) and collect three different flowers. Ask the students to tell you what they know about flowers. Does anyone know the names of the flower parts?
- Using the gathered flowers, ask students to dissect two of them to see if they can find similarities and differences in the parts. Provide each group of three or four students with a laminated copy of The Basic Parts of a Flower page, which is linked at the end of this activity. Ask them to use the image to dissect their last flower and then tape the parts to a piece of paper and label the parts.
- Use the Parts of a Flower poster to review the parts of a flower. Discuss the function of each flower part, the processes of pollination and fertilization, and the difference between perfect and imperfect flowers.
- Collect plants for pressing. Each student should gather at least ten plants or plant parts (e.g., flowers, stems, and leaves).
- A commercial flower press may be purchased, or you can make one out of cardboard, newspaper, and heavy books. Plants can also be pressed between the pages of a large book, but the pages may become warped.
- Pick flowers and other plant parts when they are at their peak to ensure a saturated, vibrant color. Press as quickly as possible to preserve plants at their freshest. Choose flowers and plants that will press flat. Something that is too bulky will not press or display correctly.
- Lay the plant materials between two pieces of newspaper on top of a piece of cardboard. Make sure the flowers, plants, and leaves are not touching or overlapping or else they may stick to each other. Place another piece of cardboard on top.
- Repeat this procedure for each layer in the press, and then tighten the straps or screws or place a few large, heavy books on top. If pressing between the pages of a book, allow about 1/8" of pages between sections for even pressing, then close the book, and place other books on top for additional weight.
- Allow at least two weeks, preferably three, to press the plants and ensure that thick items are dry.
- Have students arrange the flowers and plant material on poster board trimmed to fit in a picture frame. Once they have decided on placement, have them lightly spray adhesive to the back of the plant materials and stick them onto the poster board. Tweezers may be helpful in placing flowers.
- Place the pressed plant arrangement in a frame and enjoy or give as a gift.
File, Map, or Graphic
Author
Debra Spielmaker
Organization
Utah Agriculture in the Classroom
Lessons Associated with this Resource
- Exploring Texture in the Garden (Grades 3-5)
- Exploring Texture in the Garden (Grades K-2)
- How Does Your Garden Grow? (Grades 3-5)
- Flower Power (Grades 3-5)