 Cultivating Knowledge - Connecting Us All
utah.agclassroom.org
Cultivating Knowledge - Connecting Us All
utah.agclassroom.org
Bread in a Bag
This activity details the instructions for making bread in a Ziploc bag. An excellent way to demonstrate bread-making and the properties of yeast within a classroom setting.
Time to Complete
30
Materials
- 2 cups all-purpose flour
- 2 cups whole wheat flour
- Warm water
- 2 tablespoons sugar
- 1 package yeast or 2-1/4 teaspoons (quick rise yeast will speed things along)
- 1-2 teaspoons salt
- 1 tablespoon oil
- Plastic wrap
- Cooking oil spray
- Heavy-duty Ziploc bag
- Food handlers gloves (available from restaurant supply stores or school cafeteria)
- Various measuring cups and spoons
- Cookie sheets
- Oven
Procedures
- Making bread is an art and a science. Prepare for making "bread-in-a-bag" by obtaining enough ingredients for each loaf. It is best to divide your students into groups of two, but groups of four will also work.
- Heavy-duty Ziploc bags will ensure that you will not have rips or tears causing a mess. Also the bag keeps the process neat and fairly sanitary. If you are making bread as a microorganism experiment, vary the yeast, sugar, salt, or water temperature for interesting results. The only time your students will touch the dough is when it is placed on the cookie sheet. (A cookie sheet is what is most readily available in school cafeterias, and kids can make different shaped loaves for identification. You won't need 15 bread pans!) Only one student needs to place the dough on the cookie sheet. Cheap food handlers gloves sprayed or coated with vegetable oil work great for this transfer.
- The observations of the dough can be made throughout the kneading process. Doughs with extra sugar will seem quite a bit wetter, while those with extra yeast will seem quite hard. Students should record their observations while making the bread, while it rises (compare quick rise yeasts with regular yeasts), and then again after the bread is baked (texture, flavor, etc.).
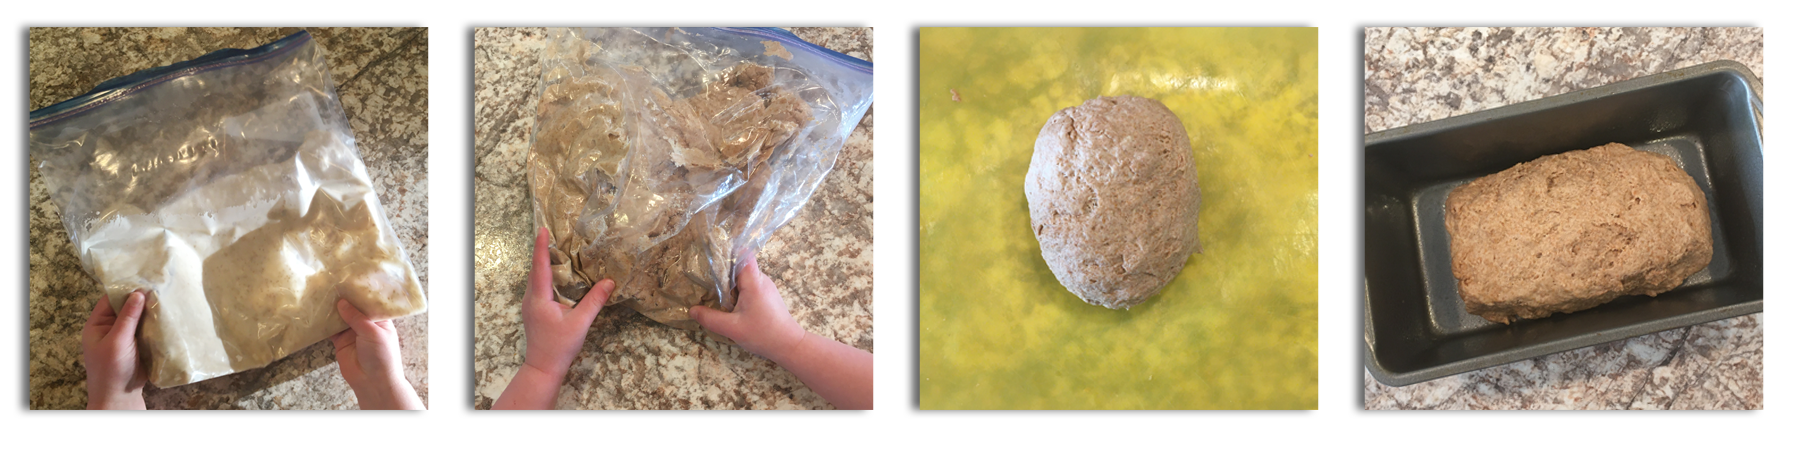
- In a one-gallon (heavy-duty) Ziploc bag, mix: 1/2 cup all purpose flour 1 pkg. or 2-1/4 teaspoons yeast 1/2 cup warm water 2 tablespoons sugar.
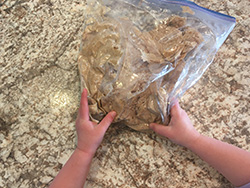
- Close the bag and knead it with fingers until the ingredients are completely blended.
- Leave the bag closed, with the contents in the corner, and let rest 10 minutes. You can eliminate this wait by using instant yeast.
- Then add: 2 cups whole wheat flour 3/4 cup warm water 1 tablespoon vegetable oil 1-2 teaspoons salt Mix well. Add enough all-purpose flour to make a stiff dough, about 1 or 1-1/2 cups.
- Close the bag and knead it (you may need to remove some air in the bag). Add more flour until dough no longer sticks to the bag.
- Spray the hands or gloves (food handlers gloves) with oil so there will be no sticking.
- Open the bag and allow the dough to fall out onto clean or gloved hands.
- Form the dough into a loaf, and place in a loaf pan or onto a cafeteria cookie sheet. Remember the dough will grow 1-1/2 times larger, so leave space between loaves if baking on a cookie sheet.
- Cover the loaves with oil sprayed plastic wrap and allow to rise 30 (quick rise yeast) to 45 minutes.
- Bake for 30-35 minutes in a 350 degree oven.
- Now that's "real world" science! Students can actually figure out what yeasts need to live and what they produce as wastes, gas bubbles, or wonderful bread aroma. For more information about making bread visit the Bread World website.
Author
Utah Agriculture in the Classroom
Lessons Associated with this Resource