Outreach
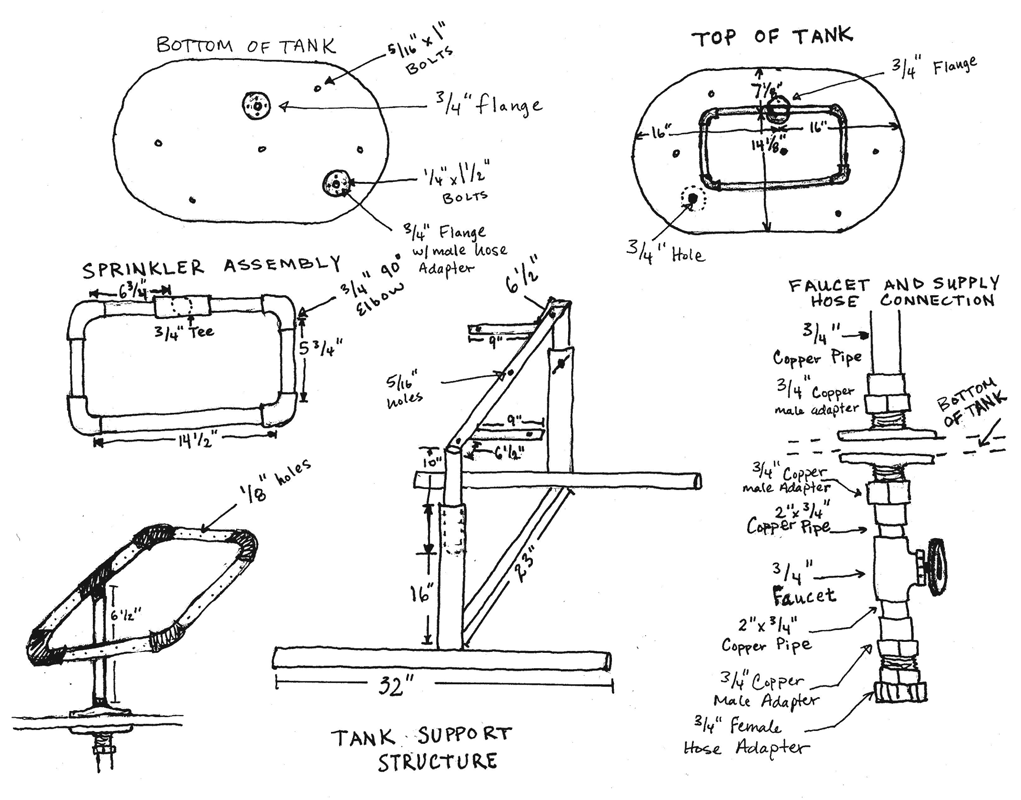
Plans & Materials List for Handwashing Station
Required Tools
- Arc Welder (mig or stick)
- Chop or metal band saw
- Grinder (bench and/or handheld)
- 3/8" Drill
- 1/8", 1/4", 5/16" Drill Bits
- Copper Pipe Cutter
- Soldering Kit ( propane bottle, regulator/torch, solder paste and brush, abrasive paper, soldering wire)
- Basic hand tools ( end wrenches, pliers, safety glasses ect.)
Required Parts
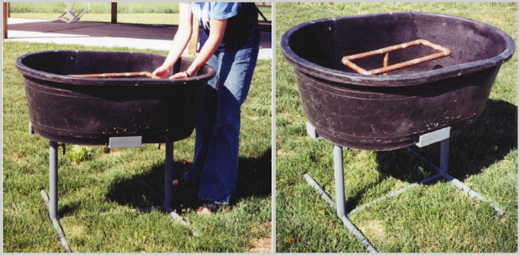
- 40 gallon Tuf-Tank (can be purchased from IFA or Cal-Ranch)
- 3/4" copper pipe (it was cheapest to just buy a 10' length)
- 1 tube silicone
- 1 tube pipe joint compound or teflon tape
- 9' x 1.00" schedule 40 pipe
- 3' x 1.25" schedule 40 pipe
- 4' x 1.5" x 1.5" angle
- 7- 5/16" x 1" bolts
- 7- 5/16" nuts
- 5- 5/16" flat washers
- 8- 1/4" x 1 ½" bolts
- 8- 1/4" nuts
- 4- 1/4" flat washers
- 4- 3/4" 90 degree copper elbows
- 1- 3/4" copper tee
- 3- 3/4" threaded flange
- 1- 3/4" threaded pipe - male hose adapter
- 1- 3/4" threaded pipe - female hose adapter
- 1- 3/4" faucet
- 4- 3/4" copper pipe - 3/4" threaded male pipe adapter
- 6" x 3/8" metal rod
Assembly Instructions
- Cut 2 lengths of 1" schedule 40 pipe each 32" long
- Cut 2 lengths of 1" schedule 40 pipe each 10" long
- Cut 1 length of 1" schedule 40 pipe 23" long
- Cut 2 lengths of 1.25" schedule 40 pipe each 16" long
- Cut 2 lengths of 1.5" x 1.5" angle each 9" long
- Cut 1 length of 1.5" x 1.5" angle 23" long
- Cut the 6" x 3/8" rod in half making two 3" pieces for the height adjustment handles (after cutting all the metal you can grind the ends smooth on a bench grinder or wait until you have finished welding everything and then use a hand grinder to smooth everything up)
- Drill a 5/16" hole into the 1" x 10" long schedule 40 pipe about 2" from one end
- Weld a 5/16" nut over the hole
- Weld the two 3" pieces of 3/8" rod to the head of a 5/16" x 1" bolt making a handle
- Screw the handle into the 5/16" nut you welded over the hole
- Insert the 1" x 10" pipe into the 1.25" x 16"pipe and tighten down the adjustment handle so that there is about 2" of the 1" x 10" pipe sticking out the top of the 1.25" x 16" pipe
- Weld the 16" x 1.25" pipe to the center of the 32" x 1" pipe forming a tee; do this twice to form 2 separate tees
- Weld a tee that you just made to each end of the 23" x 1" pipe making sure that everything is square
- Weld the 23" x 1.5" x 1.5" angle iron to the top of the 1" x 10" pipe sticking out of the 1.25" x 16" pipe
- Weld one piece of 9" x 1.5" x 1.5" angle iron to the 23" x 1.5"x 1.5" angle iron about 6" in from the end pointing to the left
- Weld the other piece of 9" x 1.5" x 1.5" angle iron to the 23" x 1.5" x 1.5" angle iron on the opposite about 6" in so that it points to the right
- Drill five 5/16" holes in the angle iron in the pattern shown in the illustration
- Cut the 3/4 copper pipe into the following
1-14 ½"
2- 6 3/4"
1- 6 ½"
2- 5 3/4"
2- 2" - Solder the pieces of copper pipe and fittings together to form a rectangle ( refer to illustration for location of fittings and pieces of pipe)
- Using the drill and 1/8" bit drill holes about ½" apart all the way around the copper rectangle that you built. It is much easier if you use a punch and hammer to center punch were you are going to drill first
- Solder the rest of the pieces of copper pipe and fittings together to form the faucet and supply hose connection (make sure to put teflon tape or joint compound on all threads before assembly)
- Attach one 3/4" flange to the down pipe from the copper pipe rectange
- Attach the second 3/4" flange to the faucet assembly
- Using the soldering torch and pliers, heat up a scrap piece of copper pipe and push it through the bottom of the plastic tank to form a hole in two places according to the diagram
- Place 2 of the 3/4" flanges so that they are centered over the holes you just made
- Using the drill and a 1/4" drill bit drill through the tank using the third 3/4" flange as a template
- Place silicone around the outside of 2 of the 3/4" flanges and put them on the inside and outside of the tank and over and under the center of the hole you made with the heated copper pipe
- Secure the flanges using the 1/4"x 1 ½" bolts and nuts
- Place silicone around the outside of the remaining flange and place it on the underside of the tank, centered on the hole that is in the corner of the tank
- Secure the flange using 4- 1/4 x 1 ½" bolts, nuts and washers, making sure to place the washers and the head of the bolts on the inside of the tank on the opposite side of the flange
- Put teflon or joint compound on the male hose adapter pipe thread side and screw it into the 3/4" flange
- Center the tank over the support structure you welded together
- Drill 5/16" holes through the tank using the holes previously drilled into the angle iron as a template. This is most easily accomplished if you tip the tank and support structure upside down, re-center it, and then drill
- Bolt the tank to the support using the 5/16" x 1" bolts, nuts, and flat washers making sure that the head of the bolt and the flat washer are in the inside of the tank (Caution: Do not over-tighten the bolts as they may pull through the plastic tank)
- Place a dab of silicone over the heads of the bolts and the washers to ensure that the tank won't leek